Add extra fields
After you create an extra table, you must set up fields in the table, to allow you to subsequently input data (entries). You can also create extra fields in standard tables.
Steps
-
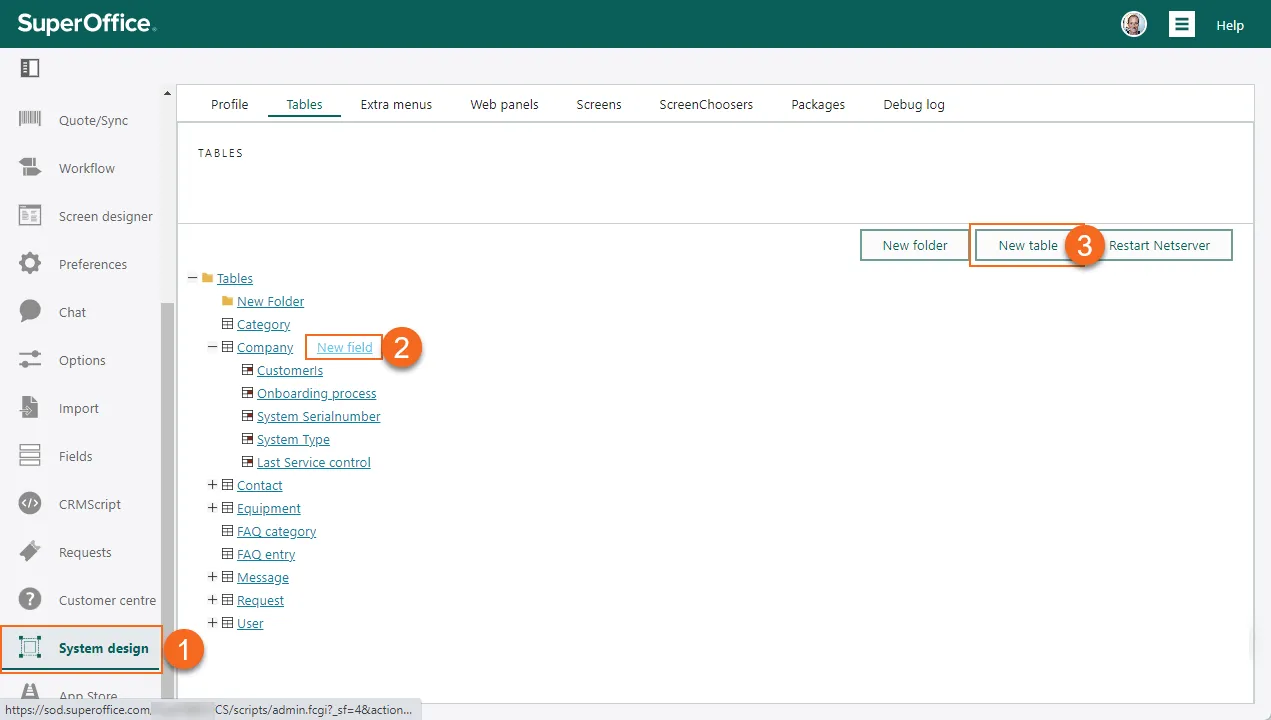
Go to Settings and maintenance > System design. Then select the Tables tab.
-
Browse to your desired table, point at the table name, and click New field.
-
Select a type for the new field and click OK.
-
In the Field properties screen, enter data about the new field.
- Enter a name to be used as the label.
- Enter a database field beginning with x_ to identify the field in the schema.
- Optionally set other properties. The type (specified in step 3) determines what is available. Se details about the fields below.
🛈 TipTo make a field mandatory, select Cannot be empty. -
Click OK to save the new field (runs
alter table y_mynewtable add column x_mynewfield ...). -
Continue adding more fields.
-
Click Restart NetServer when you are done. If Travel is activated, you will also see a message that a new Travel database must be generated.
Field properties
| Property | Description |
|---|---|
| Cannot be empty | Makes it mandatory to fill in this field. |
| Choose from list box | If the field is connected to an extra table, select this option to display a list of table values. |
| Choose values from list | If checked, the field turns into a list box. The list options are the text strings inputted in the text box, with one option per line. |
| Create index | If selected, it is possible to search by this field. It is quicker to search for data in indexed fields. |
| Database field | The column’s name in the database must be unique within the table. It should be a single word, containing only underscores, letters (a-z), or numbers, and must start with “x_”. This can only be set during creation and and cannot be changed. |
| Decimal places | The number of decimal places that are allowed in a number. |
| Default value | The value to be inserted by default in this field. |
| Description | The default description. |
| Display value | Whether to display the field’s value. |
| External | If checked, the field is available from a customer centre. Relevant only for standard tables (extra tables are always displayed in customer centres). |
| Header for list | A header for these entries when they are displayed as “sub-entries” in a list. |
| Hide function buttons | (relations) Select this option to hide the function for adding new entries to relation tables. |
| Hide the field | Whether to display the field. |
| Keep HTML tags | (text) Select this option to include the HTML tag in the text. |
| Name | The name of the field. |
| Number of units | (time span) The maximum number of units for the “largest” selected time unit. Example: If you selected hours and minutes, and enter “4”, a maximum of 4 hours can be selected, while minutes go to 60. Similarly for days and hours, a maximum of 4 days can be selected, while hours go to 24. |
| Only allow leaf nodes for hierarchical list boxes | (extra table relation) Specify if only the lowest node in a hierarchy can be selected by the user. |
| Position | Specifies this field’s position among the other fields in lists. |
| Search operator | Which search operator to use for this field. |
| Show in table | If checked, this field is displayed as a column in screens where several entries are displayed in a table. |
| Show one-to-many relations | If you selected the Contact relation, Company relation or Request relation field types and want to display a tab containing data from this table in the contact, company, or request screens, you can check this field. |
| Table | The table this field belongs to. |
| Target table | Which table to use. |
| Text area / Height | The number of lines of the text field. |
| Type | Displays the field type you selected. |
| Update null values now | Check this option to replace all null values (empty fields) in the database with the default value. This operation can take a while. |
| URL | The URL of the dynamic link here. |
| Use active user as default value | If checked, the field’s value is by default set to the current user. |
| Use current date/time as default value | If checked, the field’s value is by default set to the current date/time. |
| Use days / Use hours / Use minutes | The time unit for the time span field. |
| Use default value | If checked, the field is assigned a default value unless otherwise specified. |
| View in relational choosers | If the current table has a relation with another table (extra table relation), select this option to make this field available as a search field. Example: You created an extra table called “Products” with an extra table relation to the Requests table. In this way you can search for and add products in the Extra fields tab when creating new requests. By selecting View in relational choosers for specific fields in the “Products” table, these fields are available as search fields in the Extra fields tab. |
Add relation (foreign key, FK)
-
Click New field.
-
Select the relation type for the entity you want to connect to and click OK.
-
Set field properties as described above.
🛈 NoteAvailable from version 10.3.4 in pilot: Selecting Show one-to-many relations adds a section tab (archive) to related standard entities. -
Click OK to save the relation.
-
Click Restart NetServer to apply the changes.
For example, to connect all incoming requests to a specific sale, you can add an extra field of type sale relation to requests (ticket table). To list connected requests when viewing a sale in SuperOffice CRM, you will need to build a web panel.