Creating ASP.net website using SO controls
This tutorial demonstrates how to create an ASP.NET website with SuperOffice controls such as SoTextBox and SoLabel.
Goal: a login page using SO controls and then to allow the user to retrieve a list of appointment details based on associate ID, appointment active date, and end date entered by the user.
Adding the references
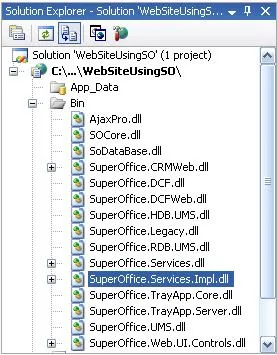
Since we are planning to use SO controls, we need to add the SuperOffice.Web.UI.Controls.dll file. Visual Studios will also add dependent DLLs, such as SOCore.dll and SuperOffice.Services.dll.
Once the GUI state of the site is complete we need to have certain DLLs that enable us to retrieve data from the SuperOffice database. Since we plan to use the Services layer exposed by the NetServer, we need to add SuperOffice.Services.dll and SuperOffice.Services.Impl.dll.
The basic references needed to create an ASP.Net website using SO controls
The web.config
When creating any website, it is necessary to have a web.config file. Here, we copy it from the SuperOffice application and modify it as required. The SuperOffice Services and Database sections need to remain in the config file so that we can talk to the database:
[!code-xmlXML]
Since we are not using the SuperOffice and PageBuilder features, we don’t need their sections in the config file:
[!code-xmlXML]
We can also clean out a lot of ASP.net config that is specific to SuperOffice
[!code-xmlXML]
The resulting config file has the settings necessary for SODatabase to talk to the database via the web service API, and for the DCF to talk to the resource DLLs.
Theme - getting the SuperOffice look
To make the web controls look like SuperOffice, you need to copy the theme from SuperOffice to the new web site, and include a Theme directive in the web.config file:
<pages theme="Six" validateRequest="false" enableEventValidation="false" viewStateEncryptionMode="Never">
</pages>
Add the Theme folder to ASP.net (via the special ADD ASP.NET FOLDER menu) and copy the DefaultStyles.css from SuperOffice to the folder.
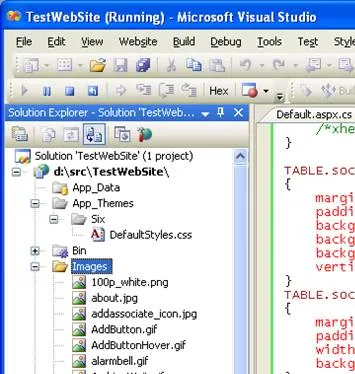
Add the IMAGES folder to the website to complete the look:
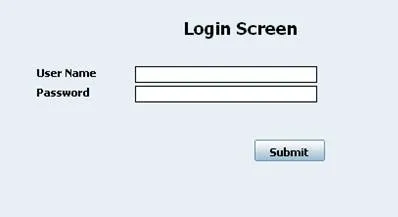
Login page
This is the page that is used by us to authenticate users – denying access to users we don’t recognize. The page consists of SO controls such as SoTextBoxes and a SoButton. Following is the source code for the Login.aspx page.
[!code-htmlHTML]
We have placed all our SO controls inside <asp:Login></asp:Login>. Before we use SO Controls we need to register them by using the below statement.
[!code-htmlHTML]
Once the registration is declared, we can use the SO controls on the page. For example, an SoTextBox is shown below.
[!code-htmlHTML]
We have placed the SoTextBox inside a div to specify the exact location that we want our control to be placed on the screen. so:SoTextBox tells the compiler a control which is of SoTextBox type is used and the ID of it “UserName” is used by the code behind to retrieve the user entered data. A required field validator is used to make sure that the user name is not null.
Then next unique SO control that is used by us is the SoButton:
[!code-htmlHTML]
The Submit button is an SoButton. It gets the SuperOffice look but is otherwise a plain old button. Once the button is clicked it accesses a method called LoginBtn_Click from the code behind.
The code behind Login.aspx is as follows.
[!code-csharpCS]
Since we just want to show how we can use SO controls in an ASP.Net website we have not made a special effort in our code behind the file to make any un-necessary validations and make the code lengthy.
What we have done once the Submit button is clicked is to retrieve the user-entered user name and password and stored them in session variables as shown below.
[!code-csharpCS]
Next, we have used the Session class’s Session.Authenticate method to validate the entered user name and password. And if the entered data is correct the user will be directed to the Appointments.aspx page. This is shown below.
[!code-csharpCS]
The login screen without the styles or themes in place:
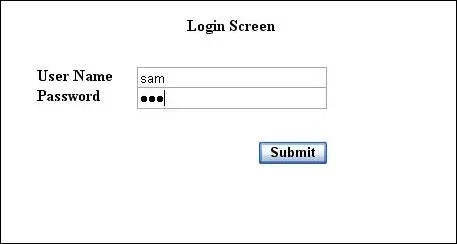
With theme and images in place it looks more like SuperOffice:
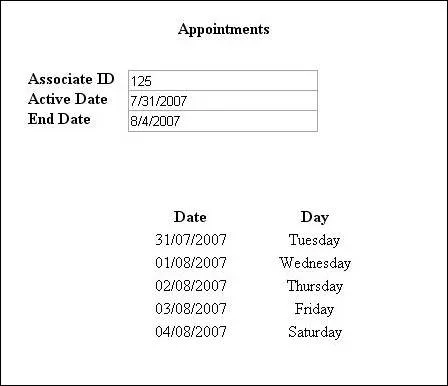
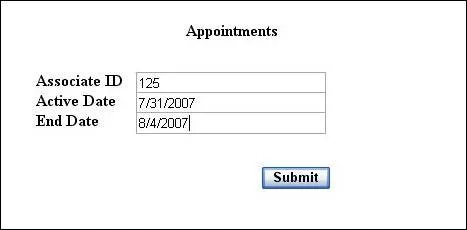
Appointments
Once the user has been authenticated he will be directed to this page. The page allows the user to enter some requirements and based on the entered requirements the data is retrieved using the NetServer services layer.
<%@ Page Language="C#" AutoEventWireup="true" CodeFile="Appointments.aspx.cs" Inherits="Appointments" %>

<%@ Register TagPrefix="so" Namespace="SuperOffice.Web.UI.Controls" Assembly="SuperOffice.Web.UI.Controls" %>

<!DOCTYPE html PUBLIC "-//W3C//DTD XHTML 1.0 Transitional//EN" "http://www.w3.org/TR/xhtml1/DTD/xhtml1-transitional.dtd">

<html xmlns="http://www.w3.org/1999/xhtml" >
<head runat="server">
  <title>Appointments</title>
</head>
  <body>
    <form id="form1" runat="server">
      <div style="text-align: center">
        <div style="position: absolute; top: 25px; left: 400px; white-space: nowrap; ">
          <asp:Label ID="LabelPage" runat="server" Text="Appointments" Font-Bold="True" />
        </div>
        <div style="position: absolute; top: 75px; left: 250px; white-space: nowrap; ">
          <asp:Label ID="lblAssoicate" runat="server" Text="Associate ID" Font-Bold="True" />
        </div>
        <div style="position: absolute; top: 75px; left: 350px">
          <so:SoTextBox Width="184px" TabIndex="1" MaxLength="60" runat="server" ID="assoicateID" />
        </div>
        <div style="position: absolute; top: 95px; left: 250px; white-space: nowrap; ">
          <asp:Label ID="lblActivedate" runat="server" Text="Active Date" Font-Bold="True" />
        </div>
        <div style="position: absolute; top: 95px; left: 350px">
          <so:SoTextBox Width="184px" TabIndex="1" MaxLength="60" runat="server" ID="activeDate" />
        </div>
        <div style="position: absolute; top: 115px; left: 250px; white-space: nowrap; ">
          <asp:Label ID="lblEndDate" runat="server" Text="End Date" Font-Bold="True" />
        </div>
        <div style="position: absolute; top: 115px; left: 350px; white-space: nowrap">
          <so:SoTextBox Width="184px"  MaxLength="60" ID="endDate" TabIndex="1" runat="server" />
        </div>
        <div style="position: absolute; Top: 170px; right: 20px; width: 80px; left: 470px; ">
          <so:SoButton ID="datesBtn" runat="server" TabIndex="4" Text="Submit" Font-Bold="True" OnClick="datesBtn_Click" />
        </div>
        <div style="position: absolute; Top: 210px; right: 20px; width: 80px; left: 350px; ">
          <table id="tblid" runat="server" style="width: 250px; ">
            <tr>
              <td style="font-weight: bold">Date</td>
              <td style="font-weight: bold">Day</td>
            </tr>
          </table>
        </div>
      </div>
    </form>
  </body>
</html>
The above code reflects the GUI of the login page, it consists of 3 SoTextBoxes and a SoButton. These GUI elements have been added in the same way as on the login page and the IDs of the text boxes are used to link them to the code behind. Once the Submit button of the page has been clicked it will execute a datesBtn_Click method. Once the method has been executed the Submit button will disappear and instead a table containing the result will appear. This is also done through the code behind the file.
The code behind the file of the Appointments.aspx is as follows.
using System;
using System.Data;
using System.Configuration;
using System.Collections;
using System.Web;
using System.Web.Security;
using System.Web.UI;
using System.Web.UI.WebControls;
using System.Web.UI.WebControls.WebParts;
using System.Web.UI.mdControls;

using SuperOffice;
using SuperOffice.CRM.Services;

public partial class Appointments : System.Web.UI.Page
{
  protected void Page_Load(object sender, EventArgs e)
  {
    if(!IsPostBack)
      this.tblid.Visible = false;
    else
      this.tblid.Visible = true;
  }

  protected void datesBtn_Click(object sender, EventArgs e)
  {
    using (SoSession mySession = SoSession.Authenticate(Session["UserName"].ToString().Trim(), Session["passWord"].ToString().Trim()))
    {
      //retrieve user inputs and store them in variables
      TextBox ai = form1.FindControl("assoicateID") as TextBox;
      TextBox ad = form1.FindControl("activeDate") as TextBox;
      TextBox ed = form1.FindControl("endDate") as TextBox;

      //converting the values to the format required by the method
      int personID = int.Parse(ai.Text);
      DateTime activeDate = DateTime.Parse(ad.Text);
      DateTime endDate = DateTime.Parse(ed.Text);

      //retrieve the appointments list using the Agent
      AppointmentAgent newAppAgt = new AppointmentAgent();

      ActivityInformationListItem[] newAppArr = newAppAgt.GetActivityInformationListByDatesAndAssociate(activeDate, endDate, 103);

      //Displaying the Appointments between a given date range of and Associate
      for (int i = 0; i < newAppArr.Length; i++)
      {
        //Instantiate table rows and table cells
        HtmlTableCell tblcelldate = new HtmlTableCell();
        HtmlTableCell tblcellday = new HtmlTableCell();
        HtmlTableRow tblrow = new HtmlTableRow();

        //Assigning data to the table
        tblcelldate.Controls.Add(new LiteralControl(newAppArr[i].Date.Date.ToString("dd/MM/yyyy")));
        tblcellday.Controls.Add(new LiteralControl(newAppArr[i].Date.DayOfWeek.ToString()));
        tblrow.Controls.Add(tblcelldate);
        tblrow.Controls.Add(tblcellday);
        tblid.Controls.Add(tblrow);
        datesBtn.Visible = false;
      }
    }
  }
}
The Page_Load method is used to switch the visibility state of the table that is used to display the results based on the data entered by the user. Once the Submit button of the page has been clicked it will execute datesBtn_Click(). The method checks and evaluates the Session using session variables. The values of the session variables have been updated when the user authenticates themselves on the login page.
Once the user has been validated the data entered into the SoTextBoxes are converted into TextBox types of the .NET framework. And then these are converted into the respective types that are accepted by the GetActivityInformationListByDatesAndAssociate method of the IAppointmentAgent created using the AgentFactory.
The appointments retrieve from the agent are stored in an array of type ActivityInformationListItem. A for loop is used to fetch the data from this array and display them on the Appointments page using an HTML table. When the results are displayed the Submit button would become invisible.
Before:
After: